Wakoopa

This post was imported from my old blog “Get Ctrl Back” on 2010-09-28. Some stuff in this post may be broken, please leave a comment if you see any, then I will try to fix it.


I have just been using Wakoopa 1.1.1 on Linux. It works very well. I have wanted to try it when it was not ready for Linux. I do know how long it has started supporting Linux, it surely does it great because it also have a 64-bit client. The packages only are for DEB and RPM package managements, but the binary tarball is easy to use.


The only problem I have is it is not able to detect the CLI/TUI programs, simply because it has no easy way to determine which CLI/TUI program you are currently using. As in X, we have many different terminal emulator, then few terminal window managers. It is nearly impossible that you could tell which is running by a code. We also still have virtual consoles, but this probably not the case to talk because Wakoopa is a GUI program. Not many people will use X and switch to virtual console to work.


The web tracking works normally with Firefox 3.5.5. But I am not satisfied with it, it uses CrunchBase as the website database. But as I checked up on CrunchBase, it is really a company-oriented. I don't see gnu.org or kernel.org in it.


I may be using Wakoopa for a little longer. It really couldn't fully reflect my use on computer. I stay a lot of time in terminal. I know I can use gvim instead of vim, but I rather not to. I think Wakoopa is better for Windows and OS X users, because the normal users of theirs are stuck to GUI programs.

Python SimpleHTTPServer comes in handy

This post was imported from my old blog “make YJL” on 2010-09-28. Some stuff in this post may be broken, please leave a comment if you see any, then I will try to fix it.
Have you ever tried to write a simple JavaScript code, like a bookmarklet? Or tried to do something with local files from Firefox?

Normally, the safety policy forbids such behaviors, but if you have a local web server you can get around it. (No! Changing the policy is the most dangerous and stupidest way to get around it, and it is the best way to put yourself in danger.)

So, I remember Python has such module, I was thinking to write a quick one. But you can just do:
cd /path/to/root_files_of_your_web_server/
python -m SimpleHTTPServer

It does the job, you can access via http://localhost:8000/. You can change the port by appending the new port number.

Is this safe? Only if you know your firewall setting. Make sure the port you choose is random enough and/or you do not open that port to public. This quick SimpleHTTPServer listens to all addresses. And create a special directory just for this server, it only contains enough files you need. Do run it at your home directory or root unless you are 100% sure what you are doing.

Mononono? What?

This post was imported from my old blog “Tux Wears Fedora” on 2010-09-28. Some stuff in this post may be broken, please leave a comment if you see any, then I will try to fix it.
Mononono is a package I just heard and the purpose of it is to conflict with any other packages which needs Mono.

There are quite a few on Linux world, and you probably have one or two apps on your computer and you are not even knowing about. Many people do not like Mono since the fundamental design is from Microsoft's .NET framework. I do not like it, either. Because I have to have another set of libraries in my system.

So this genius, Tim Chase, created a package to solely conflict those packages depend on Mono. This is the most brilliant idea I have ever seen.

Let's do this together: Mono, (pause for a second) NO! NO! (Point your index figure up, then wave it and shake your head a bit)

PS. On Gentoo, use package.mask to do the same thing.

(via Arch Forum post)

Geeqie Image Viewer

This post was imported from my old blog “Tux Wears Fedora” on 2010-09-28. Some stuff in this post may be broken, please leave a comment if you see any, then I will try to fix it.
A commenter mentioned a image viewer I hadn't heard before, Geeqie. It was forked from gqview. It is not in Gentoo packages, but it is easy to compile. The version I used is 1.0beta2.

It is really fast and most important feature is Raw image support. With feh, I have to use UFRaw to convert raw images into jpeg format. But it's okay for me because I don't view raw image often, well, I don't view other images often, either. The only problem with Geeqie is it has too many features ( :-) ) I do not use, especially those editing functions.

Here is a screenshot of it:

Geeqie Image Viewer

You can see another good feature in the filelist of the screenshot, it merges images with same main filename and different image file types. It's a nice feature, I think.

The other thing I noticed when I was configuring it, a word showed up, Win32. I don't know if it is really supporting Windows, I didn't dig in.

Anyway, I will keep Geeqie on my system just for the raw images. Feh is still easier to use since I am usually in $ prompt or MC, I only need to run feh . or use F2 menu to bring up feh.

OpenSUSE 11.2

This post was imported from my old blog “Tux Wears Fedora” on 2010-09-28. Some stuff in this post may be broken, please leave a comment if you see any, then I will try to fix it.
This is my second time of installing OpenSUSE but I had forgot what it was like for the first time. I downloaded the DVD spin, the installation only took 22 minutes for my computer. KDE was selected by default, I didn't change to GNOME.

Before I put the disc to the computer, I had thought about I should try to avoid using terminal this time! Well, that hope didn't last long after the installation finished.

Once the first-time boot, the first thing I had to do was to enable the network, the DSL. It was not hard to use YaST (Administrator Settings) to configure DSL connection, but it needed a required package, smpppd. That was easy again if you know the commandline or you didn't get locked up from that awesome PackageKit. (Which is also as good as NetworkManager, these two have earned my sincere respect, to keep away from them)

I mounted the DVD to /media and use rpm to install /media/suse/i586/smpppd-*.rpm. I added a new DSL connection, it worked very well. In some distros, I had to remove a default gateway from routing table after just brought up the connection without rebooting.

Next thing is to fix the screen resolution, it is relative simple. I added a new software repository from nVidia and searched for driver again, installed it. Then stuck on a smaller resolution 640480. Switched back to runlevel 3, ran nvidia-xconfig and set the ModeLine (I need this, or I would have Out of Range, I believed this is the driver's fault). The desktop effects works well after the driver installed, I couldn't say it runs fast but smooth enough.

Adobe Flash already in place (or after updated, I couldn't be sure), the non-free media codecs are not problem either, you only need to add additional software repository. KDE's Kaffeine uses Xine, thus libxine1-codecs from Packman repository is the right one. However, it would have dependency conflicts, the resolution on OpenSUSE's YaST is the one thing I have to mention, check the screenshot below:


It provides intelligent options to let you resolve the conflict, in my case, the first one can resolve perfectly. OpenSUSE uses RPM, too, as same as Fedora does. I haven't seen similar thing on Fedora. If I were using Fedora, I have to manually uninstall those conflicts. But think later, the packaging policy in Fedora might be better, it would actually result a several upgrades when you add new repository, therefore conflicts would not be the case usually.

OpenSUSE is nice distribution, I haven't had big problem with it (though I have to use terminal). Too bad, I only have few days to try it out, Fedora 12 is available, I am going to try it next.

Cannot wait for Fedora 12?

This post was imported from my old blog “Tux Wears Fedora” on 2010-09-28. Some stuff in this post may be broken, please leave a comment if you see any, then I will try to fix it.
Are you expecting Fedora 12?

while [ 1 ]; do wget -q http://fedoraproject.org/en/get-fedora -O - | grep -q "f12" - && notify-send -u critical 'Hooray! Fedora 12 is available!' && break ; sleep 10m ; done

Get notified!

Migrating to tmux from GNU/Screen

This post was imported from my old blog “Tux Wears Fedora” on 2010-09-28. Some stuff in this post may be broken, please leave a comment if you see any, then I will try to fix it.
If you have heard of or have used GNU/Screen, then you know what tmux is for; if you haven't, you probably do not want to read the following content, or you have wasted lots of time in doing terminal window cycling.

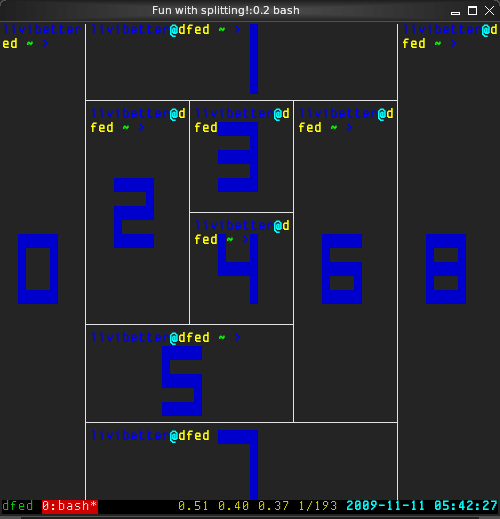
What's the major difference between these two? The splitting:

Splitting in tmux
The numbers in blue indicate the pane number
(Default key: Ctrl+b q)

That maybe over-splitting. Anyway, it's the main reason that I decided to switch to tmux. I know somewhere on the internet has patch for Screen. But I didn't manually compile program, it would be not easy for me to maintain. If you have a good alternative, why bother to keep to the one lacking the functionality which you need. And Screen is no longer to add new feature, it's in bugfix-only. tmux is new, highly active.

tmux's current version is 1.1. I had encounter a problem with version 1.0 when with 256 colors. Some color escape code doesn't do what it suppose to do.

It only took me an hour to create my own configuration to get similar key bindings and status bar.

tmux and Screen

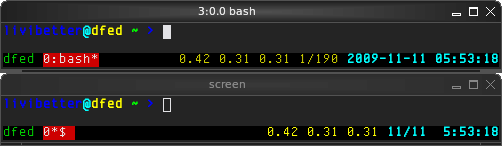
The one on top is tmux. They are nearly identical and tmux is actually better.

The memory footprint is much smaller than Screen if you usually use several sessions. On my Gentoo amd64, when you start a tmux server, it takes 2.35 MB without counting Bash's; Screen takes 2.6 MB. If you fire up a second session, tmux use 1.0 MB more but Screen uses another 2.6 MB.

My configuraion ~/.tmux.conf

# Last modified: 2009-11-12T05:59:41+0800

# Change prefix key to Ctrl+a
unbind C-b
set -g prefix C-a

# Last active window
unbind l
bind C-a last-window

# Copy mode
unbind [
bind Escape copy-mode
# Use Vi mode
setw -g mode-keys vi
# Make mouse useful in copy mode
setw -g mode-mouse on

# More straight forward key bindings for splitting
unbind %
bind | split-window -h
bind h split-window -h
unbind '"'
bind - split-window -v
bind v split-window -v

# History
set -g history-limit 1000

# Pane
unbind o
bind C-s down-pane

# Terminal emulator window title
set -g set-titles on
set -g set-titles-string '#S:#I.#P #W'

# Status Bar
set -g status-bg black
set -g status-fg white
set -g status-interval 1
set -g status-left '#[fg=green]#H#[default]'
set -g status-right '#[fg=yellow]#(cut -d " " -f 1-4 /proc/loadavg)#[default] #[fg=cyan,bold]%Y-%m-%d %H:%M:%S#[default]'

# Notifying if other windows has activities
setw -g monitor-activity on
set -g visual-activity on

# Highlighting the active window in status bar
setw -g window-status-current-bg red

# Clock
setw -g clock-mode-colour green
setw -g clock-mode-style 24

There is really no much need to explain. The first thing I did was to change the prefix key  to C-a, C-b is really hard to press.

The other thing I like is you can specify the terminal window's title with the format you like.

Panes Splitting, cycling, etc

Basically, you only need to know four keys for controlling:
Key Default Action
h,|    %    Split window horizontally
v,-    "    Split window vertically
C-s    o    Go to next pane
x      x    Kill the active pane
q      q    Show pane numbers
A-Arrow Key Resize the active pane
C-Arrow Key Resize the active pane by one line or on character 

I think h, v are more straight forward in thinking then %, ", and |, - are more clear but it's harder to press because you have to use Shift key for |.

C-s is better than o, it would be even better if you use C-a as prefix key. You can press in this sequence: C-a (still hold Ctrl) s. A key is next to S, it's much easier to go next pane.

One thing I am not satisfied with panes is it's not easy to know which pane is active if you do not pay attention and the programs do not have blinking cursor. I have the terminal title to indicate the active pane number, so I am able to tell which pane I am in.

Scripting

Sometimes you will want to have presetting windows to be prepared automatically. For example, you may want to have foo program in window 0, window 1 has two split panes, and have bar program in pane 1. Because tmux is highly script-able.

I was actually hoping to use alternative configuration using -f argument when fire up tmux, but I didn't get it well after some time point. I don't why it didn't seem to work.

Anyway, if you create a script, there is no problem at all.

Here is an example of how I bring up centerim:
#!/bin/sh
tmux new-session -d -s centerim centerim
tmux new-window -t centerim:1 CIM_status_setter.py
tmux select-window -t centerim:0
tmux -2 attach-session -t centerim

The first command creates a detached (-d) new session named (-s) centerim and also run centerim in the first window of this new session. It then creates a new window and assigns (-t) to session centerim's window 1, and also run a Python script. The third one selects the window 0 as the active window.

The last one attaches to session centerim, from here, we would be using this session centerim. The -2 forces tmux to use 256 colors.

Note that if you need to run a program with arguments, you will need to use quotes, for example:
tmux new-session -d -s session_name 'program arg1 arg2'

Vim

After I switched to tmux, I found out the mouse support in Vim didn't work. My original setting for mouse is:
set mouse=a
set ttymouse=xterm2

Now I have to use:
set mouse=a
set ttymouse=xterm

I still can move the cursor using mouse but the visual selection is different than when ttymouse=xterm2.
xterm2       Works like "xterm", but with the xterm reporting the
             mouse position while the mouse is dragged.  This works
             much faster and more precise.

Hardcopy and Logging

Currently I don't see tmux has both. In Screen, you can use them by press C-a h and C-a H, respectively.

A related operation is to use copy mode, manually select the area, copy to buffer, then use save-buffer command to save to file.

Clock

You can show the current time in active pane, default key is t.


The only customization of this clock mode is the color, not really useful feature for me.

Other keys

I think the following keys are most useful for me:
Key    Default Action
C-a       l    Last active window
Escape    [    Enter copy-mode
PageUp  PageUp Same as above
:         :    Enter command
?         ?    Show keybindings
s         s    Choose session to attach
d         d    Detach from current session

Conclusion

tmux is easy to learn, you only need the manual of it. The man page is written clear and very useful. Only few things that I could not have tmux to do for me as I had in Screen. I have been using tmux for days, I really don't have a big problem with it. I may uninstall Screen very soon.

Remove a property from GAE model

This post was imported from my old blog “make YJL” on 2010-09-28. Some stuff in this post may be broken, please leave a comment if you see any, then I will try to fix it.
This article, Updating Your Model's Schema, is already great and clear, but it does not have a complete code example. I decided to make one and write down some explanations. Just in case I might need it later.

It has one two stages to remove a property from a data model:
  1. Inherit from db.Expando if the model does not inherit from that.
  2. Remove the obsolete property from model definition.
  3. Delete the attribute, the property, of each entity del entity.obsolete
  4. Inherit from db.Model if the model originally inherited from.

How to actually do it:

Assume a model look like:
class MyModel(db.Model):
foo = db.TextProperty()
obsolete = db.TextProperty()

Re-define the model to:
class MyModel(db.Expando):
#class MyModel(db.Model):
foo = db.TextProperty()
# obsolete = db.TextProperty()

Make sure the model inherit from db.Expando and comment out (or just delete the line) the obsolete property.

Here is the example code to delete the attribute, the property:

from google.appengine.runtime import DeadlineExceededError

def del_obsolete(self):

count = 0
last_key = ''
try:
q = MyModel.all()
cont = self.request.get('continue')
if cont:
q.filter('__key__ >=', db.Key(cont))
q.order('__key__')
entities = q.fetch(100)
while entities:
for entity in entities:
last_key = str(entity.key())
try:
del entity.obsolete
except AttributeError:
pass
entity.put()
count += 1
q.filter('__key__ >', entities[-1].key())
entities = q.fetch(100)
except DeadlineExceededError:
self.response.out.write('%d processed, please continue to %s?continue=%s' % (count, self.request.path_url, last_key))
return
self.response.out.write('%d processed, all done.' % count)

Note that this snippet is to be used as a webapp.RequestHandler's get method, so it has self.response.

It use entities' keys to walk through every entity, it is efficient and safe. But you may also want to put your application under maintenance, preventing other code to add new entities, even though the values of keys seem to be increased only for new entities, but you really don't need to waste CPU time since new entities has no obsolete property.

Because it have to go through all entities and therefore it takes a lot of time to process. A mechanism to continue the process on the rest of entities is necessary. The code will catch google.appengine.runtime.DeadlineExceededError if it can not finish in one request, it then return a link which allows you to continue if you follow it. If you have lots of entities, you may want to use task instead of manual continuation. You may also want to set up the maximal amount of processing entities like 1000 entities in one request.

Once it has done its job, change the model definition back to db.Model and remove obsolete property line:
class MyModel(db.Model):
foo = db.TextProperty()


That's it.

Finally, the Retweet!

This post was imported from my old blog “Get Ctrl Back” on 2010-09-28. Some stuff in this post may be broken, please leave a comment if you see any, then I will try to fix it.
Twitter just rolled out the Retweet feature to more twitters.


Here is the screenshot after I retweeted a tweet:


And this is from my profile page of that retweeted tweet:


The amazing things is you can know how many people retweeted the same tweet with you and you can even Un-retweet if you change you mind.


But if you want to comment on the retweeted tweet, you have to tweet another or do the manually retweet as we do before. You are not allowed to edit the retweeted text.

My mother now uses Arch Linux... and...

This post was imported from my old blog “Tux Wears Fedora” on 2010-09-28. Some stuff in this post may be broken, please leave a comment if you see any, then I will try to fix it.
Another interesting thread got me, I subscribed to the updates when it was just posted. I was wondering how they got someone to use Linux, especially the older. I had tried but I had no victims so far. ;p

The discussion went normally until post #17. In case the post or thread got removed. I saved a screenshot.

Thread of My mother now uses Arch Linux

Wtf? (Updated: that post got moderated)

This thread is getting more interesting... The OP replied something:
... I know that when I get older and get married, I'm going to be running a Linux house. It may seem horrible of me, but I couldn't marry a Windows user. I'd compromise with OS X, probably, if that's what my wife really prefers. It's that important to me...
Serious?

Walking through/counting all entities in GAE datastore

This post was imported from my old blog “make YJL” on 2010-09-28. Some stuff in this post may be broken, please leave a comment if you see any, then I will try to fix it.
I need to count how many entity of kind Blog has boolean property accepted set to True, but I suddenly realized that OFFSET in query is no use for me (In fact, it is not really useful).

In SDK 1.1.0, OFFSET does what you think on Development Server if you first use GAE and have experience of SQL, but it's still different than on Production Server.

Basically, if you have 1002 entities in Blog and you want to get the 1002nd entity. The follows will not get you that entity:
q = Blog.all()
# Doing filter here
# Order here
# Then fetch
r = q.fetch(1, 0)[0] # 1st
r = q.fetch(1, 1)[0] # 2nd
r = q.fetch(1, 999)[0] # 1000th
r = q.fetch(1, 1000)[0] # 1001st
r = q.fetch(1, 1001)[0] # 1002nd

You will get an exception on the last one like:
BadRequestError: Offset may not be above 1000.
BadRequestError: Too big query offset.
First one is on Production Sever, second is on Development Server.

The OFFSET takes effective after:
  1. filter data (WHERE clause)
  2. sort data (ORDER clause)
  3. truncate to first 1001 entities (even though count() only returns 1000 at most)
After filtering, sorting, truncating to first 1001 entities, then you can have your OFFSET. If you have read Updaing Your Model's Schema, it warns you:
A word of caution: when writing a query that retrieves entities in batches, avoid OFFSET (which doesn't work for large sets of data) and instead limit the amount of data returned by using a WHERE condition.
The only way is to filtering data (WHERE clause), you will need a unique property if you need to walk through all entities.

An amazing thing is you don't need to create new property, there is already one in all of you Kinds, the __key__ in query, the Key.

The benefits of using it:
  • No additional property,
  • No additional index (Because it's already created by default), and
  • Combination of two above, you don't need to use additional datastore quota. Index and Property use quota.
Here is a code snippet that I use to count Blog entities, you should be able to adapt it if you need to process data:
def get_count(q):
r = q.fetch(1000)
count = 0
while True:
count += len(r)
if len(r) < 1000:
break
q.filter('__key__ >', r[-1])
r = q.fetch(1000)
return count

q = db.Query(blog.Blog, keys_only=True)
q.order('__key__')
total_count = get_count(q)

q = db.Query(blog.Blog, keys_only=True)
q.filter('accepted =', True)
q.order('__key__')
accepted_count = get_count(q)

q = db.Query(blog.Blog, keys_only=True)
q.filter('accepted =', False)
q.order('__key__')
blocked_count = get_count(q)

Note that
  • Remove keys_only=True if you need to process data. And you will need to use r[-1].key() to filter.
  • Add a resuming functionality because it really uses a lot of CPU time if it works on large set of data.

Dump from GAE and upload to Development Server

This post was imported from my old blog “make YJL” on 2010-09-28. Some stuff in this post may be broken, please leave a comment if you see any, then I will try to fix it.
I just download the data from one of my App Engine application by following Uploading and Downloading, I used this new and experimental bulkloader.py to download data into a sqlite3 database. You don't need to create the Loader/Exporter classes with this new method

It does explain how to download and upload, but, as for, uploading is only for production server. You have to look into the command line options, it's not complicated.

Here is a complete example to dump data:
$ python googleappengine/python/bulkloader.py --dump --kind=Kind --url=http://app-id.appspot.com/remote_api --filename=app-id-Kind.db /path/to/app.yaml/
[INFO ] Logging to bulkloader-log-20091111.001712
[INFO ] Throttling transfers:
[INFO ] Bandwidth: 250000 bytes/second
[INFO ] HTTP connections: 8/second
[INFO ] Entities inserted/fetched/modified: 20/second
[INFO ] Opening database: bulkloader-progress-20091111.001712.sql3
[INFO ] Opening database: bulkloader-results-20091111.001712.sql3
[INFO ] Connecting to brps.appspot.com/remote_api
Please enter login credentials for app-id.appspot.com
Email: [email protected]
Password for [email protected]:
.[INFO ] Kind: No descending index on __key__, performing serial download
.......................................................................................................................................................................................
.................................
[INFO ] Have 2160 entities, 0 previously transferred
[INFO ] 2160 entities (0 bytes) transferred in 134.6 seconds

And the following is for upload to Development Server using the sqlite3 database which we just download (not the CSV):
$ python googleappengine/python/bulkloader.py --restore --kind=Kind --url=http://localhost:8080/remote_api --filename=app-id-Kind.db --app_id=app-id
[INFO ] Logging to bulkloader-log-20091111.004013
[INFO ] Throttling transfers:
[INFO ] Bandwidth: 250000 bytes/second
[INFO ] HTTP connections: 8/second
[INFO ] Entities inserted/fetched/modified: 20/second
[INFO ] Opening database: bulkloader-progress-20091111.004013.sql3
Please enter login credentials for localhost
Email: [email protected] <- This does not matter, type anything
Password for [email protected]: <- Does not matter
[INFO ] Connecting to localhost:8080/remote_api
[INFO ] Starting import; maximum 10 entities per post
........................................................................................................................................................................................................................
[INFO ] 2160 entites total, 0 previously transferred
[INFO ] 2160 entities (0 bytes) transferred in 31.3 seconds
[INFO ] All entities successfully transferred

You will need to specify the app id, which must match the Development server is running on.

This may be no need once the bulkloader.py is stable.

help in Python Interactive shell

This post was imported from my old blog “make YJL” on 2010-09-28. Some stuff in this post may be broken, please leave a comment if you see any, then I will try to fix it.
Someone asked why does "help(import)" not work? I know the reason but it's not why I wanted to write about here. One reply exposed that I didn't know much about help. It shows a usage, that I had never known before:
help('import')

You can pass a string type, I also thought help is just printing out __doc__. And yes string also has __doc__, but why would you do that? Why would you want to get __doc__ of an instance of int, str, list, etc? So I never tried to pass a string to help.

Therefore I didn't known I could even get help about keywords. Moreover, I thought help was a function, which is not after I dug in. help is an instance of site._Helper. site module will be loaded automatically when you fire up Python interactive shell. Once it load, the help in shell is an instance of site._Helper.

If you invoke help without any arguments, help(), this will bring you to interactive help, I had never tried to use help without passing an object before.

This is actually invoking site._Helper.__call__, which is an instance method, means the instance of site._Helper is callable, and that's the way you get into interactive help.

site._Helper also has overridden __repr__ method, if you just type help and hit enter. The interactive shell will actually invoke this __repr__ method, and that's how we get this hint
Type help() for interactive help, or help(object) for help about object.

Note this does not directly mention that you can use help('string'), where string could be a module name, a keyword, or a topic. But you can know it from the message after you quit interactive help:
>>> help()

Welcome to Python 2.6! This is the online help utility.

If this is your first time using Python, you should definitely check out
the tutorial on the Internet at http://docs.python.org/tutorial/.

Enter the name of any module, keyword, or topic to get help on writing
Python programs and using Python modules. To quit this help utility and
return to the interpreter, just type "quit".

To get a list of available modules, keywords, or topics, type "modules",
"keywords", or "topics". Each module also comes with a one-line summary
of what it does; to list the modules whose summaries contain a given word
such as "spam", type "modules spam".

help> quit

You are now leaving help and returning to the Python interpreter.
If you want to ask for help on a particular object directly from the
interpreter, you can type "help(object)". Executing "help('string')"
has the same effect as typing a particular string at the help> prompt.

Maybe this is my excuse that I did know help better.

I Love Lunch!

This post was imported from my old blog “Blogarbage” on 2010-09-28. Some stuff in this post may be broken, please leave a comment if you see any, then I will try to fix it.
Awesome! Another great musical, I Love Lunch, from Improv Everywhere. Though it's quite similar to Food Court Musical in many aspects except the starting, it's still good. If I had a friend who do that on me in public, I would wish I could dig a hole and bury my head in. Paul: Jeff, don't sing a song, man! LOL!


Is that a real cop? The article didn't say if he is, just mentioned some guy was shocked when found out the cop was in it.

Relay IE's message: There aint no shame in <3ing lunch.

BFS (Brain Fuck Scheduler) Test

This post was imported from my old blog “Tux Wears Fedora” on 2010-09-28. Some stuff in this post may be broken, please leave a comment if you see any, then I will try to fix it.
A post caught my interesting, which is about the huge boost on x264 encoding. We will all see the change when the kernel 2.6.32 comes, it uses BFS, a new process scheduler. The current kernel uses CFS (Completely Fair Scheduler). Phoronix has a benchmark report for BFS.

I decided to do a little test. Because I have no background, so the test is just a rough numbers. Here is my system:
  • Core 2 Duo T5600 1.83GHz
  • Gentoo amd64
  • Kernel 2.6.31-gentoo-r4 (It's kernel 2.6.31 with genpatch)
  • Kernel 2.6.32-rc5 (Just for reference)
  • kernel config file from my 2.6.30 configuration
  • BFS v304
Simple concurrent process test

First, I have no idea how should I test. I just want to get some number to read. My test program is written in Python (So you knew I really have no idea), because Python's threading could only use one core, therefore I used processing to utilize my two cores. The test code shows as follows:
#!/usr/bin/env python

from time import sleep
from time import time
import os

from processing import activeChildren
from processing import Process


MAX_COUNT = 1000000
MAX_PROCESS = 32
PASSES = 5


def counter():

c = 0
while c < MAX_COUNT:
c += 1


def do_test(PROCESS_COUNT):

processes = []
for i in range(PROCESS_COUNT):
p = Process(target=counter)
p.setDaemon(True)
processes.append(p)

t_start = time()
for p in processes:
p.start()
while activeChildren():
sleep(0.001)
t_end = time()
return t_end - t_start


def main():

avg_times = []
for concurr in range(1, MAX_PROCESS + 1):
print 'Running concurrent %3d processes...' % concurr,
acc_time = 0.0
for i in range(PASSES):
acc_time += do_test(concurr)
avg_time = acc_time / PASSES
avg_times.append(avg_time)
print '%9f seconds' % avg_time

fname = 'test-c%d-p%d-%s' % (MAX_COUNT, MAX_PROCESS, os.uname()[2])
f = open(fname, 'w')
data = (os.uname()[2], avg_times)
f.write(repr(data))
f.close()
print
print 'Data written to %s.' % fname


if __name__ == '__main__':
main()

As you can see, the created process doesn't do actual things. It just keeps counting up. Each test would run five times and get an average of elapsed time.


#Proc  2.6.31   (Cost)  2.6.31-bfs   (Cost)  2.6.32-rc5   (Cost)     Impr%
1 0.156739( 0.156739) 0.151051( 0.151051) 0.156921( 0.156921) 3.63%
2 0.220114( 0.110057) 0.152029( 0.076014) 0.155770( 0.077885) 30.93%
3 0.311475( 0.103825) 0.230545( 0.076848) 0.238812( 0.079604) 25.98%
4 0.318061( 0.079515) 0.316369( 0.079092) 0.307760( 0.076940) 0.53%
5 0.451945( 0.090389) 0.379189( 0.075838) 0.390504( 0.078101) 16.10%
6 0.493751( 0.082292) 0.462939( 0.077157) 0.466906( 0.077818) 6.24%
7 0.617738( 0.088248) 0.534748( 0.076393) 0.542779( 0.077540) 13.43%
8 0.639118( 0.079890) 0.614359( 0.076795) 0.619499( 0.077437) 3.87%
9 0.759511( 0.084390) 0.685477( 0.076164) 0.698372( 0.077597) 9.75%
10 0.782722( 0.078272) 0.766383( 0.076638) 0.775433( 0.077543) 2.09%
11 0.883538( 0.080322) 0.834171( 0.075834) 0.852352( 0.077487) 5.59%
12 0.942532( 0.078544) 0.913356( 0.076113) 0.930670( 0.077556) 3.10%
13 1.056529( 0.081271) 0.998580( 0.076814) 1.014098( 0.078008) 5.48%
14 1.096089( 0.078292) 1.062566( 0.075898) 1.092146( 0.078010) 3.06%
15 1.207977( 0.080532) 1.136702( 0.075780) 1.172611( 0.078174) 5.90%
16 1.276357( 0.079772) 1.215091( 0.075943) 1.253329( 0.078333) 4.80%
17 1.360708( 0.080042) 1.289036( 0.075826) 1.323230( 0.077837) 5.27%
18 1.415339( 0.078630) 1.372739( 0.076263) 1.408926( 0.078274) 3.01%
19 1.507686( 0.079352) 1.442193( 0.075905) 1.486329( 0.078228) 4.34%
20 1.617503( 0.080875) 1.510492( 0.075525) 1.562270( 0.078114) 6.62%
21 1.652496( 0.078690) 1.592773( 0.075846) 1.644975( 0.078332) 3.61%
22 1.737832( 0.078992) 1.680954( 0.076407) 1.735154( 0.078871) 3.27%
23 1.797144( 0.078137) 1.738987( 0.075608) 1.833433( 0.079714) 3.24%
24 1.873404( 0.078058) 1.814224( 0.075593) 1.880322( 0.078347) 3.16%
25 1.959188( 0.078368) 1.886172( 0.075447) 1.958433( 0.078337) 3.73%
26 2.044073( 0.078618) 1.967344( 0.075667) 2.041252( 0.078510) 3.75%
27 2.094033( 0.077557) 2.032489( 0.075277) 2.110076( 0.078151) 2.94%
28 2.186407( 0.078086) 2.112829( 0.075458) 2.197447( 0.078480) 3.37%
29 2.256274( 0.077803) 2.187584( 0.075434) 2.267832( 0.078201) 3.04%
30 2.341825( 0.078061) 2.263803( 0.075460) 2.344355( 0.078145) 3.33%
31 2.413136( 0.077843) 2.338420( 0.075433) 2.446170( 0.078909) 3.10%
32 2.500092( 0.078128) 2.429601( 0.075925) 2.522627( 0.078832) 2.82%


Note that Improvement% is 2.6.31-bfs improvement over 2.6.31, cost means the time to run 1000000 count per process,

Compilation Test

For a real use test, I think compilation is a good one to do. So I chose e2fsprog 1.41.9 to test, here are the result:


#Job 2.6.31  2.6.31-bfs 2.6.32-rc5  Impr%
1 36.232000 35.235000 35.746000 2.75%
2 23.511000 20.168000 20.327000 14.22%
3 21.740000 20.885000 20.902000 3.93%
4 21.700000 21.308000 21.397000 1.81%
5 21.954000 21.433000 21.741000 2.37%

Note that Improvement% is 2.6.31-bfs improvement over 2.6.31.

Conclusion

In both tests, all got improved. With the number of concurrent running processes and the number of jobs are the same as the number of cores, the improvements have reached peaks.

One thing more interesting is, with CFS, the performance is better when you use 3 to 4 jobs, especially 4 jobs, it has best time. And the cost comes to minimum.

With BFS, the cost time reaches minimum just 2 jobs. It begins slightly reducing improvement after 2 jobs, the number of cores.

Also BFS has resulted smaller kernel build:
Size    Kernel
1991232 kernel-x86_64-2.6.31-gentoo-r4
1974720 kernel-x86_64-2.6.31-gentoo-r4-bfs

It seems that CFS reaches the best performance at 2*N processes and BFS reaches the best performance at N processes, where N is the number of cores. And BFS always got the better performance in these tests.

CFS doesn't stay steady after 2*N processes, the curve finally becomes steady after 24 processes. But BFS is already steady at N processes.

BFS does look good.

(results ploting python codes: 1, 2, 3)

Interesting flowchart for Hey Jude and...

This post was imported from my old blog “Blogarbage” on 2010-09-28. Some stuff in this post may be broken, please leave a comment if you see any, then I will try to fix it.
Just saw this flowchart for Hey Jude by The Beatles. The flowchart didn't have all lines of lyrics but quite enough to make you laugh for the genius of the creator.

But more interesting is the recommendations of the video from YouTube:


Great Depression, cooking? WTH? They are my recent favorites, wonder what kind of algorithm YouTube uses.

Well, fuck everyone. Amen.

This post was imported from my old blog “Blogarbage” on 2010-09-28. Some stuff in this post may be broken, please leave a comment if you see any, then I will try to fix it.
A twitter I followed tweeted (got to favor it) the clip below exactly two months ago, and a month ago, a blog I read posted it. It is like recurring reminders around me, they kept pondering me. After, I had been waiting to post about it, but I didn't because it's kind of way too negative. Hell, who am I to care about that?


After I watched the clip [YouTube], I checked out the film (Synecdoche, New York). It's kind of abstract to me, I knew I didn't catch the concept of this film well. Basically, the plot is good but it has nothing to do with this post. All I want to bring up is the last line of dialog in the clip.
Minister: Everything is more complicated than you think. You only see a tenth of what is true. There are a million little strings attached to every choice you make; you can destroy your life every time you choose. But maybe you won't know for twenty years. And you may never ever trace it to its source. And you only get one chance to play it out. Just try and figure out your own divorce. And they say there is no fate, but there is: it's what you create. And even though the world goes on for eons and eons, you are only here for a fraction of a fraction of a second. Most of your time is spent being dead or not yet born. But while alive, you wait in vain, wasting years, for a phone call or a letter or a look from someone or something to make it all right. And it never comes or it seems to but it doesn't really. And so you spend your time in vague regret or vaguer hope that something good will come along. Something to make you feel connected, something to make you feel whole, something to make you feel loved. And the truth is I feel so angry, and the truth is I feel so fucking sad, and the truth is I've felt so fucking hurt for so fucking long and for just as long I've been pretending I'm OK, just to get along, just for, I don't know why, maybe because no one wants to hear about my misery, because they have their own. Well, fuck everybody. Amen.
I didn't mean to shout that out to everyone nor to particular someone, it's just a feeling of yelling that. Though, I only tweeted, yelling that is really not my way at the moment. Nope, it didn't make me better but it seemed to be a necessary step to relieve. Some things or nothing caused all of the sudden irrational feelings, no clue of what just happened, or what the hell I am writing.

Well, fuck everybody. Amen.

Going to no-multilib profile

This post was imported from my old blog “Tux Wears Fedora” on 2010-09-28. Some stuff in this post may be broken, please leave a comment if you see any, then I will try to fix it.
Two or three days ago, I realized I have been awhile that I didn't have any 32-bit programs on my harddisk. I don't run WINE, Adobe AIR, etc. So, I decided to go to the no-multilib profile, though I knew I would not get any real benefit from it. How so? First, multilib profile enables your Gentoo to be able to run 32-bit program, it would give your the 32-bit library, such as glibc. I didn't have any 32-bit programs on my system, I have no need to have  the 32-bit library. And how many free space I can get from switching to n-multilib? Less than 90MB (/lib32 + /usr/lib32), that's why I said I wouldn't get any benefit. However, I still want to go for it.

I am not sure if I would need to run a 32-bit program someday soon, it's not a problem because I have another computer. If you only have one, stay with multilib.

The only benefit I can see is when you need to re-emerge glibc or some libraries, using no-mulitlib would cut the compilation time into half since you no longer need the 32-bit library anymore. You should have known you wouldn't re-emerge glibc in monthly basis. So averaging the compilation time shows that it's not really a time-consumption. Again, I still want to go for it.

I did some searches, it turned out that process is relatively simple. There are two threads in mailing list mentioned about the steps, Moving to no-multilib profile and Difference between multilib & no-multilib stages. You might also want to read this wiki page, it's a little bit of old, but it has some useful information before you make a decision. Also this post (Dis)advantages of multilib in forums should give you some thoughts.

What I did?

First, use eselect to switch to no-multilib profile. Un-emerged the grub and emerged grub-static, grub-install to install the statically linking binary version of grub, then reboot to make sure it works.

grub is 32-bit only, we will need a pre-compiled binary package since we would no longer be able to compile 32-bit program and grub-static is the one for that.

After that, re-emerged gcc, sandbox, and glibc, lastly.

I also disabled the following kernel configuration:
Executable file formats / Emulations
[ ] IA32 Emulation

I rebooted again, but I found out udev didn't work. I did noticebefore I recompiled kernelthat /lib has gone and kernel modules install did create it again. According to this post, I moved the kernel modules to /lib64/modules and made a symbolic link, that resolved the problem. Maybe I should just move lib64 to lib?

Warning

Firstly, you may want to backup before you do the switch if you have no much experience of Gentoo and/or Linux. Make sure you have an installation disc or a livecd to fix the mess you might make.

Secondly, all the sources say it's not easy to do in reverse way. If you want to go backward, re-installing is the most easiest way for that.