As of 2016-02-26, there will be no more posts for this blog. s/blog/pba/
Showing posts with label image. Show all posts

For a long time, Id wanted to make a screenshot like the following image, and I finally found plugin can help me, GIMP Tear-off plugin.

https://lh3.googleusercontent.com/-qjqkU2-VQjk/UP9-OppVYQI/AAAAAAAAEVI/J3SGuNh9Qq8/s640/gimp-tear-off-1.png

Example of Tear-off plugin

(screenshot edited from GIMP website)

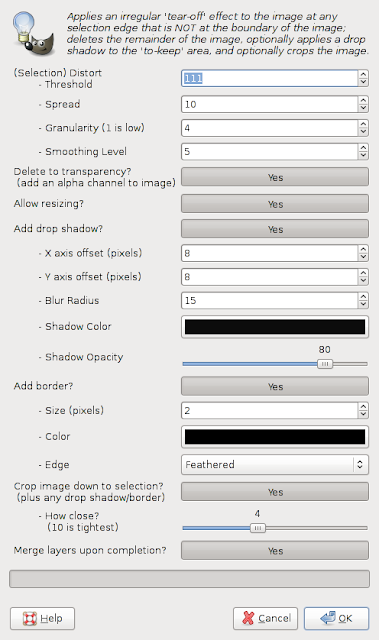
Some blogs use this style of screenshot, jagged edges like a piece of papar torn off into two parts. You can doiit manually in GIMP to achieve the same effect, but that takes time. With Tear-off, its only a few clicks in the dialog as shown as follows.

To use this plugin, the only thing you really need to do is selecting the area you want to keep. Tear-off keeps selection and processes non-selected area to add jagged edges around the selection. You can choose how ragged the edge you want, add shadow and border. With little manipulation, you can have some highlighting effect like the following image.

https://lh4.googleusercontent.com/-rBN-utD4jfE/UP9-QLLIlGI/AAAAAAAAEVQ/Mq-4IPwVfDM/s640/gimp-tear-off-2.png

Example of Tear-off plugin

(screenshot edited from GIMP website)

The selection doesnt have to be rectangle as you can see from the image above. I used Tear-off twice and with brightness and contrast adjust plus mask editing for the fade-out effect at top and bottom of image. That makes the important part very stand-out and also keeps some context around selection.

Ive used Tear-off for screenshots for my posts. Next example uses first tear-off to highlight two rows, then second one to cut off unwanted rows between wanted area and the bottom row. I wanted to preserve the information in bottom row but not to highlight it since its not the primary focus.

If you have a screenshot is very long and you only need top and bottom area, here is how you do it. Select unwanted area, then inverse selection, apply tear-off, lastly, the zealous crop to compress the image. You will get a compact image like the following one.

The version of Tear-off I use is 0.2, more than two years old, for GIMP 2.6. The latest GIMP version is 2.8, I dont know if this plugin works in GIMP 2.8. Its licensed under the GPLv3, anyone can fix or improve this plugin.

Google just announced a new image format, WebP. The statistics of compression ratio looks very promising. But I wonder about the process time of reading. So I downloaded webp-leptonica (version 0.0.1) tarball and added few lines to webpconv.c to time it with libvpx 0.9.0 (with mmx sse sse2 ssse3 threads flags).

--- webpconv.c.original 2010-09-30 02:19:39.000000000 +0800
+++ webpconv.c  2010-10-01 08:26:48.000000000 +0800
 -39,6 +39,7 
 #include <stdio.h>
 #include <stdlib.h>
 #include <string.h>
+#include <time.h>
 #include "allheaders.h"

 #define DEFAULT_PSNR 42.0
 -218,13 +219,17 
     }

     struct Pix \*pixs;
+    clock_t c0, c1;
+    c0 = clock();
     if (!strcmp(ext, ".webp")) {
       pixs = pixReadWebP(argv[a_idx]);
     } else {
       pixs = pixRead(argv[a_idx]);
     }
+    c1 = clock();
+    printf ("Elapsed CPU time on reading pixels: %10.6f seconds\n", (float) (c1 - c0) / CLOCKS_PER_SEC);
     FREE(ext);
-
+
     if (pixs == NULL) {
       fprintf(stderr, "Failed to read image\n");
       return 1;
 -240,6 +245,7 
       format = "png";
     }

+    c0 = clock();
     if (strcmp(format, "bmp") == 0) {
       pixWrite(fileout, pixs, IFF_BMP);
     } else if (strcmp(format, "jpeg") == 0) {
 -275,6 +281,8 
     else {
       return ERROR_INT("Format not supported", "webpconv", 1);
     }
+    c1 = clock();
+    printf ("Elapsed CPU time on conversion    : %10.6f seconds\n", (float) (c1 - c0) / CLOCKS_PER_SEC);

     free(fileout);
     pixDestroy(&pixs);

My goal is to time pixRead() and pixReadWebP(). This may just be a rough numbers, here is the results on images from this page:

The blue block is about JPG to WebP, and the purple block is about WebP, which is from previous conversion of JPG to WebP, to WebP. I didnt set the quality, I let the program to decide on its own.

As you can see the size are reduced after the conversion. But, interestingly, the read time or decode time, its not the same story. For bigger images, it seems to need more time for decoding pixel data. I dont know about image library or processing. Maybe this is not practical or the library is not optimized yet. Anyway, this new format is still new.

Honestly, I dont really think anyone can kill JPEG, even the Google. Yes, Google may be able to push this new format or anything into our programs, WebM is the good example. But the old stuff support is too hard to be dropped, till today some people still use GIF (not for animation) instead of PNG. If someday, Flickr supports the WebP embedding, I will still not use it to put images in my blog.

By the way, why are 5.jpg and 8.jpg missing?

A commenter mentioned in this post a image viewer I hadnt heard before, Geeqie. It was forked from gqview. It is not in Gentoo packages, but it is easy to compile. The version I used is 1.0beta2.

It is really fast and most important feature is Raw image support. With feh, I have to use UFRaw to convert raw images into jpeg format. But its okay for me because I dont view raw image often, well, I dont view other images often, either. The only problem with Geeqie is it has too many features ( :-) ) I do not use, especially those editing functions.

Note

In January, 2014, I switched to sxiv from feh.

Here is a screenshot of it:

http://farm3.static.flickr.com/2680/4131920944_0c7cf0caef.jpg

You can see another good feature in the filelist of the screenshot, it merges images with same main filename and different image file types. Its a nice feature, I think.

The other thing I noticed when I was configuring it, a word showed up, Win32. I dont know if it is really supporting Windows, I didnt dig in.

Anyway, I will keep Geeqie on my system just for the raw images. Feh is still easier to use since I am usually in $ prompt or MC, I only need to run feh . or use F2 menu to bring up feh.

Earlier today, I changed my avatar on Twitter. It's for fun that make avatar look like blank image. However, you still can see something from the avatar.


So, here comes this post. I use GIMP to make another one from a cat image. The original is


(Kind of cool face, isn't?)


The rough steps

  1. Firstly, open it and duplicate the layer. And don't forget to add alpha channel. Name the duplicated layer as Edge.


  2. Apply Filters Edge-Detect Sobel... on Edge layer. The result looks like


  3. Remove some unwanted edges, only leave the main part. In this case, the cat's head.

  4. Add Black (full transparency) layer mask to Source layer.

  5. Copy Edge layer onto Source's layer mask.

  6. Reduce Opacity to make the image be barely seen.

  7. Enhance if the ghost image is not evenly seen:

    a) Duplicate the Edge as Enhance.

    b) Remove the parts that are too strong from Enhance layer.

    c) Adjust Opacity of Enhance layer to make ghost image looks balanced.


The final image


Yes, it's right above. (I set the opacity way too low. :p) The final GIMP file is here.

I just changed my avatar to:


(Yes, it's really here, I guarantee!)


Because it's special, therefore only those websites which support PNG can use it, or it will only be ugly black avatar.


Anyway, here is the list of those websites that support PNG avatar:

  • Blogger

  • Get Satisfaction


  • Google Groups

  • Google Profile

  • Jamendo


  • Last.fm


  • LiveJournal

  • Picasa Web Albums

  • Twitter

  • Yahoo


  • Youtube

Here is another list of those websites which don't support PNG avatar:

  • 43Things

  • Blip.fm


  • Disqus


  • Facebook

  • Flickr


  • FriendFeed

  • Gravatar

  • Technorati


  • Ustream.tv


  • Verisign PIP

  • Vimeo