As of 2016-02-26, there will be no more posts for this blog. s/blog/pba/
Showing posts with label HTML. Show all posts

When I blog, sometimes I write in reStructuredText if the post is about technical topic involving programming codes, otherwise I just write in Blogger's editor.

Oftentimes, I was lazy when the post is very short like this one you are reading, so Blogger's editor was. If there is some HTML code or code like a >= b, I'll have to use escape tool or manually escape by hand.

Since I use Pentadactyl (fork of Vimperator), by pressing Ctrl+I, I can use external editor Vim when I need to do some re-indentation or mass replacement using regular expression. If you have done some reviewing on Stack Overflow, you definitely need to take care of a lot re-indentation, some code's spaces or tabs were eaten randomly, mysteriously, by the posters.

I adapted a code from Vim wiki, so I can also do escaping.
" ==========================================================================
" HTML Encode/Decode
" ==========================================================================
" ref: http://vim.wikia.com/wiki/HTML_entities#Perl_HTML::Entities
function! HTMLEncode()
perl << EOF
 use HTML::Entities;
 @pos = $curwin->Cursor();
 $line = $curbuf->Get($pos[0]);
 $encvalue = encode_entities($line);
 $curbuf->Set($pos[0],$encvalue)
EOF
endfunction

function! HTMLDecode()
perl << EOF
 use HTML::Entities;
 @pos = $curwin->Cursor();
 $line = $curbuf->Get($pos[0]);
 $encvalue = decode_entities($line);
 $curbuf->Set($pos[0],$encvalue)
EOF
endfunction

vmap <Leader>h :call HTMLEncode()<CR>
vmap <Leader>H :call HTMLDecode()<CR>
Only difference is the key mapping, it's most likely I only use escaping in Visual mode, because the code needs to be escaped is only a part of post. Certainly, I would select the part and escape them. If I need to escape the whole file, I can just type :%call HTMLEncode() or select all and use the key mapping.

Blogger is fine with some situations with characters like < or >, but definitely not HTML or XML element tag, you will have to escape them or it may think you actually want to use those HTML for your post.

And, yes, I know there is an option to tell Blogger not to interpret HTML code. But who uses that option, I would guess it's someone who doesn't even know what HTML is or never need to paste code into their posts. I am a programmer and I know what I want. For me, if I need italics style, most times, I wrap the text in <i/> by hand, it's much faster than moving mouse cursor to the button.

Right now, every place should be after April 1 in their local time. On March 31, I decided to create my own April Fools Day join and here is a screencast of what would happen when you visit my blog on April 1 local time in case you missed it:

https://i.ytimg.com/vi/4NBT9job-9E/maxresdefault.jpg

Within 24 hours, the code will be removed. You may still be able to see this if you reset the date to 1st.

I even posted a fake post for luring feed readers in because I know they wouldnt see anything in their favorite reader. Also a post on Google+, just did my best to spread the fun.

I dont know if I should paint some eggs next.

A recent engage with a reader reminded me of a long existing issue with threaded comments.

Note

The content in this post is no longer reflecting the status of this blog. (2015-12-10T02:50:47Z)

I like threaded more than flat. They both have advantages and disadvantages. In threaded comments, as the depth increasing, you can lose in the discussion as you may have in flat comments.

One reason, I prefer threaded is because flat is very easy to get confused when read someones reply to another comment, which could be posted a few ahead. An experienced commenter would include the comment # or the commenters name, but its very problematic.

Another good reason to use threaded comments is some comments are asking for help, with threaded comments, I can reply/answer to the question specifically. The asker can clearly know which comment is my answer to his or her question. This is not something, you can work around with flat comments easily.

Threaded could easy resolve such confusion, but it has own issues. As discussion grows, it can still get complicated as flat comments do.

But another issue has bothered me more than the issue mentioned above, the layout. The comments section is a fixed width design, when there is too many levels of replies, the widths of deeper comments get smaller and smaller. Eventually, it becomes too narrow as you can see the comments in this post.

In Disqus, you can switch to flat or limit the maximal depth of comments. But I dont want to use flat or to have limit of depth.

Right now, there is a new option on top-left corner to switch between variable width and fixed width. It is not meant to resolve, but simply a workaround. I dont really have any good idea for a brilliant layout for threaded comments.

I took the chance to add a notice just before the comments, it says:

Please keep your comments relevant to this post and try not to comment something like only Thanks in entire comment, use the Like button of Disqus, instead. You can use some HTML tags if you like.

This was something I had wanted to do a year ago, finally, I added it. This blog is created with fixed width at 640px, I have to break it, which I dont like, but I dont have better way to deal with.


Who is bored
Who can code
Who has time
Venn Diagram

This is how I wasted my time. 100% hand-coded.

Warning

The project is dead and some links have been removed from this post. (2015-12-02T00:25:07Z)

ItchApe is a simple solution which enables you showing off your apes current itch to the world. You scratch your ape and its itch can be read.

1   Features

  • An itch can be described in up to 140 characters. (Its not a bird, its an ape!) Every character will be shown literally, no HTML will take effective.

2   Notes

  • An itch can be kept up to an hour, but there is no guarantee since itches are stored in memory cache.
  • All itches will not be stored in database. Once they are gone from memory cache, they are gone.

3   Get started

3.1   Adopt an Ape

You need to adopt an ape first, you will get a Secret Key and Ape ID after you submit your Secret Phrase. Make sure you write down these three information.

3.2   Install the code

Once you have your Ape ID, you can install the following HTML code,

<script src="https://ajax.googleapis.com/ajax/libs/jquery/1/jquery.min.js"></script>
<script src="http://lilbtn.appspot.com/itchape/itchape.js"></script>
<script>get_itch('<YOUR_APE_ID>', 'itchdiv')</script>
<div>My ItchApe: <span id="itchdiv"></span></div>

The itch will be shown in itchdiv. It may read like:

My ItchApe: This is my itch (3 minutes ago)

3.3   Scratch your ape

You can scratch your ape, enter the description of the itch and the phrase, key, and ID.

3.4   Scripts

There are two basic Bash scripts for scratching and getting itch, you can download them on Google Code.

4   Developers Information

4.1   Rendered code

The rendered HTML code by /itchape/itchape.js looks like

<span class="itch">The description of itch.</span> <span class="itch_timesince">(3 mintues ago)</span>

4.2   /itchape/getitch.json API

If you want to write your own script, here is how you get the itch. Send a GET request to http://lilbtn.appspot.com/itchape/getitch.json?ape_id=<APE_ID>, the return data is a JSON or JSONP if you also give callback in query string,

{
"ape_says": "...",
"itch": "...",
"scratched_at": 123456789.123
}
  • ape_says is actually the error message, it may have the values listed in ape_says section below.
  • itch is the description of the itch.
  • scratched_at is time of the ape gets scratched, the seconds after Unix epoch, its a float number.

4.3   /itchape/scratch API

If you request using GET method, then it will be a normal page. If you request using POST method, its the API for scratching.

You need to supply secret_phrase, secret_key, ape_id, and itch. If its a successful call, then the data will be sent back as if you make a getitch.json call; if not, then you will get this json {"ape_says":"I'm not your ape"}.

You can also supply callback for JSONP.

4.4   ape_says (error message)

  • "Yeah, I was itching for that!": An itch description is retrieved successfully.
  • "Not itching, yet!": There is no data in memory cache for that Ape ID.
  • "I'm not your ape!": The phrase, key, and ID do not match, there you cant scratch this ape.
  • "Oooh... that feels good!": Scratch is successful and wonderful.

You have to parse these message, there is no error codes or simple true/false to know if its successful or not. Ape doesnt know about whats an API, they say what they want.

5   Support

If you have anything want to report or to request, please submit an issue to issue tracker.

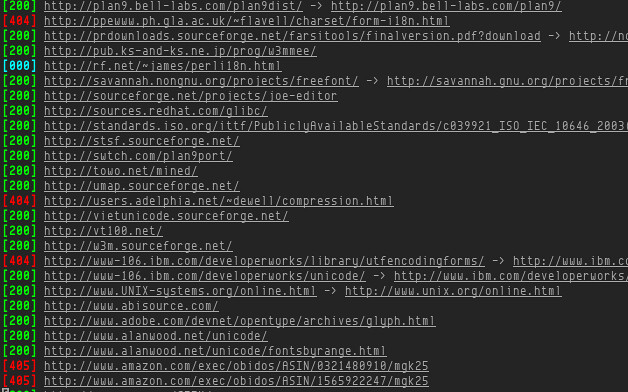
I was reading UTF-8 and Unicode FAQ for Unix/Linux, I found many links are dead. Thats the beginning of why I wrote this scrip, linkckr.sh.

http://farm6.static.flickr.com/5100/5416743679_3bb1f5e404_z.jpg

Give it a filename or a URL:

./linkckr.sh test.html
./linkckr.sh http://example.com

It does rest for you. You might want to tee, because there is no user interface, it prints results. If a page has many links, you may flood the scrollback buffer. The script is simple, actually, it does too much for me. (Ha, who needs coloring.)

I dont grep the links from HTML source, there always is a missing point in regular expression or the regular expression looks like Hulk. I decided to see if I could use xmllint to get valid links. It means only from normal <a/>, not those hidden somewhere or using JavaScript to open, nor URLs in HTML when you read it plainly with interpreting as HTML. It only takes /HTTPS?/ URLs to check.

The checking is using cURL and only used HEAD request, so you might get 405 and this script does not re-check with normal GET request. Also, those return 000, which might mean timeout after 10 seconds waiting for response. If a URL is redirected with 3xx, then cURL is instructed to follow up, and the last URL is shown to you.

There are few interesting points while I wrote this script. Firstly, I learned xmllint can select nodes with XPath:

xmllint --shell --html "$1" <<<"cat //a[starts-with(href,'http')]"

And standard input will be seen as command input in xmllints shell.

Secondly, cURL supports output format using -w:

curl -s -I -L -m 10 -w '%{http_code} %{url_effective}\n' "$url"

Note that even you specify a format, the headers of requests are still printed out. The output with the format is appended at last. The script retrieves the last line using sed '$q;d', if you are not familiar with such syntax, you should learn it. sed is quite interesting. Then it parses with built-in read, another interesting I have learned by myself long ago. Using cut is not necessary and its not so good, though read would have problem with additional spaces if those have significant meaning.

The rest is boring Bash. There is a bug I have noticed, the HTML entity in link, that would cause issue.

In this blog, a CSS class .wrapper is used for limiting the maximal width of post content, set to 640 pixel. I make sure every image will be resized to 640 pixel if either larger or smaller than 640 pixel in width using JavaScript. For YouTube videos, I always choose embedding code for 640px. I do these to have a better visual presentation, having a clear edges, stuff wouldnt poke out like a mess.

Note

This blog is no longer using this and width has changed to 800px. (2015-12-25T04:36:41Z)

But I wonder, though I am not planning using the result I would have, if its possible that I could unwrap the wrapper?

Basically, I use jQuery to (re)calculate margins for each element with .unwrapper, so those element would be located and increased the width by only using margins.

Got unwrapped yet?

localStorage is a feature of HTML5s Web Storage. You can store or retrieve as the followings:

localStorage[key] = value;
value = localStorage[key];
delete localStorage[key];

localStorage.setItem(key, value);
value = localStorage.getItem(key);
localStorage.removeItem(key);

localStorage.key = value;
value = localStorage.key;
delete localStorage.key;

You can list:

for (key in localStorage)
  console.log(key, localStorage[key]);

You can clean up at once:

localStorage.clear();

You can put every thing in but you might not get what you put in, because

The setItem(key, value) method must first create a structured clone of the given value. If this raises an exception, then the exception must be thrown and the list associated with the object is left unchanged. If constructing the structured clone would involve constructing a new ImageData object, then throw a NOT_SUPPORTED_ERR exception instead.

No, this is not about using position: fixed by default. Take a look at this page as example, scroll down, and see the top-left. Notice the issue metadata stick on top? As far as I know there is no pure CSS for this task, it uses onscroll to do the job.

Here is the source code and you can play with jsFiddle, try the auto-scroll button.

I didnt invent this, the original code is from an answer1 on Stack Overflow, and that seems to be from Stack Overflows code, but with a few of my own modifications. The code requires jQuery.

The #sticky-anchor is the most important part, it does two things:

Half a day ago, I suddenly had a very strong feeling while showering, so I tweeted this:

How I Code HTML on Seasons:<em>Spring</em> <big>Summer</big> <strong>Autumn</strong> <div style="visibility:hidden"><del>Winter</del></div>.

Now I came up with this (wait for 10 seconds, or reload page to see it again):

Four Seasons: Spring, Summer, Autumn, Winter.
<div id="seasons" style="background-color:#444;border:2px solid #888;-moz-border-radius:5px;-webkit-border-radius:5px;border-radius:5px;padding:5px;">Four Seasons: <em style="color:#4c4">Spring</em>, <big style="color:#f00">Summer</big>, <strong style="color:#ea4">Autumn</strong>, <span style="color:#cee">Winter</span>.</div>

<script type="text/javascript" src="http://www.google.com/jsapi"></script>
<script type="text/javascript">
google.load('jquery', '1');
function kill_slowly() {
        var t = $('#seasons span del').text();
        if (t.length > 0)
                $('#seasons span del').text(t.substring(0, t.length - 1));
        if ($('#seasons span del').text())
                setTimeout(kill_slowly, 1000)
        else {
                $('#seasons span').remove();
                $('#seasons').html($('#seasons').html()
                        .replace(/Four/, '<em>Three</em>')
                        .replace(/Spring/, 'Spring (Something new!)')
                        .replace(/Summer/, 'Summer (Hot, Beach, Bikinis! XD)')
                        .replace(/Autumn/, 'Autumn (Falling leaves, beautiful!)')
                        .replace(/, \./, '. <span style="color:#f00;font-style:italic;">Awesome!</span>'));
                }
        }
google.setOnLoadCallback(function(){
        setTimeout(function() {
                $('#seasons span').wrapInner('<del></del>').append(' (Freaking f**king cold!)');
                setTimeout(function() {
                        $('#seasons span').fadeOut(6000);
                        kill_slowly();
                        }, 1000);
                }, 10000);
        });
</script>

Really dont like Winter much.

See the image by yourself:


I have Opera 10 and Firefox 3.5 to show you how I don't like the select box in Chrome (4.0.275.0, Chromium) on Linux. You can see the dropdown box is shorter than text input and the button. It creates strange visual distraction, quite annoying. The others two browsers have same tall UI elements, I don't know what's wrong with Chrome.

The HTML code is:
<!doctype html>
<html>
<head>
<title>Hello HTML</title>
</head>
<body>
<p>Hello World!</p>
<input type="text" value="Text Input"/>
<input type="button" value="Click on me!"/>
<select>
<option>This is always shorter and I hate that!</option>
<option>Option2</option>
</select>
</body>
</html>

I don't have any other WebKit-based browser installed, therefore I really don't know if this is Chrome's problem or Webkit's. I hope it will have same visual appearance in further releases. I couldn't find an issue on its list about, but I am also lazy to create one. So give me a link, I will star it.
Updated on 2010-01-17 with Chromium 4.0.295.0:

It's still the same story...

chromium-4.0.295.0

If you know about HTML, you probably had use:
<a name="Damn">Blogger Drives Me Crazy!</a>
blah...
blah...
<a href="Damn">Go to Blogger Drives Me Crazy</a>
blah...
blah...

So the code above provides a in-page link. I tried to write a blog posting with that, Blogger's Compose mode made me crazy!

You have to enter the HTML code name="Damn" in HTML mode, that would be fine as long as you don't switch back to Compose mode. If you do, your code will be inserted with new attribution href and a link will be assigned to it. That wasn't the result you would like to see.

So basically, you must stay in HTML mode. However, sometimes, WYSIWYG is too convenient. Even you are a HTML nuts, you may accidentally switch to Compose mode. If your page is still Draft, God bless you! Your code has been messed up! Because of autosave.

So, I go back to Google Docs, I had been using it to write a while ago. The only problem with it is the images. I used to compose in it, then paste into Blogger's edit and inserted the photos.

Obviously, this will not be working this time.

So, I put image in Google Docs and modify the code to make it hotlink to Google Docs' server to serve images.

Here is the steps:
  1. Edit your document in Google Docs
  2. Copy HTML code from Edit/Edit HTML
  3. Use a editor can support regular expression replacement. I use Vim. After the HTML in VIm, type :%s_"File_"http://docs.google.com/File_g
  4. Paste the modified code to Blogger's editor. Don't switch to Compose mode.
This is terrible, just for name attribution. But I really don't know if there is a better way to do this. However there is a benefit of using Google Docs to do such task, it's easy to maintain those links (Bookmarks in Google Docs), you don't have to type those anchor names, you can choose from list. No typos any more.

Adding an HTML/JavaScript gadget can make your blog rich. Here is the steps:


Step 1: Go to Layout/Page Element


Here is a choice to make. You have to decide to input the code at sidebar or footer. If the code won't show any stuff to blog readers, then putting it at footer is right choice; if it do like a RSS gadget, then putting it at sidebar is correct.


If you change you mind after you creating one, you can still drag a gadget and drop onto the other section. Actually, in standard template, you can drop a gadget onto sidebar, footer, before Blog Posts, or after Blog Posts.


Step 2: Choose Gadget Type


Scroll down to the half way.


Step 3: Put the Code in


Here is another note: If this code will be running at footer, then don't use Title.


Done!


I have tried to write this post as clear as possible, but if you still can't get it, please leave a comment.