As of 2016-02-26, there will be no more posts for this blog. s/blog/pba/
Showing posts with label screenshot. Show all posts

ASCII-Pony is a screenshot information tool, but it does not display distribution logo like screenFetch, ponies from My Little Pony: Friendship Is Magic (2010-) instead, which is an animated television show for children.

https://lh3.googleusercontent.com/-4firlCDbHHk/VohyIxUeyII/AAAAAAAAIyM/l6fTI8UqOXQ/s800-Ic42/ASCII-Pony.gif

The script is even named systempony, how fitting to this pony overloading tool. You pony it for screenshot, pretty sure its a verb. As for what it actually mean, I have no clues.

This is a note for some use cases of xsnap, which I never can remember how to use them, exactly, even after five years.

1   Timestamp

This is the format I like to use:

-file "$HOME/tmp/ss/$(date +'%Y-%m-%d--%H:%M:%S.png')"

2   -region

Option value type GEOMETRY format: WxH+X+Y, for example:

xsnap -region 1280x720+2+20 -file screenshot.png

xsnap grabs 1280 by 720 pixels area at screen position 2, 20.

3   Full-screen

Using xwininfo to determine the screen size:

xsnap -file screenshot.png -region "$(xwininfo -root | sed '/\(Width\|Height\)/ {s/[ :a-z-]//gi;p} ; d' | tr '\n' ' ' | cut -d ' ' -f1-2 | tr ' ' 'x')+0+0"

The breakdown version:

xsnap -file screenshot.png -region "$(xwininfo -root |
  sed '/\(Width\|Height\)/ {s/[ :a-z-]//gi;p} ; d' |
  tr '\n' ' ' |
  cut -d ' ' -f1-2 |
  tr ' ' 'x')+0+0"

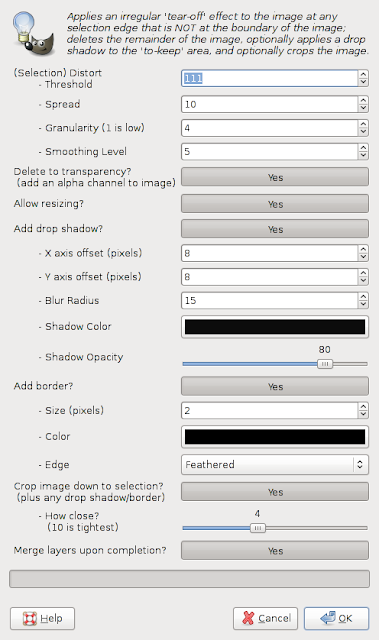
For a long time, Id wanted to make a screenshot like the following image, and I finally found plugin can help me, GIMP Tear-off plugin.

https://lh3.googleusercontent.com/-qjqkU2-VQjk/UP9-OppVYQI/AAAAAAAAEVI/J3SGuNh9Qq8/s640/gimp-tear-off-1.png

Example of Tear-off plugin

(screenshot edited from GIMP website)

Some blogs use this style of screenshot, jagged edges like a piece of papar torn off into two parts. You can doiit manually in GIMP to achieve the same effect, but that takes time. With Tear-off, its only a few clicks in the dialog as shown as follows.

To use this plugin, the only thing you really need to do is selecting the area you want to keep. Tear-off keeps selection and processes non-selected area to add jagged edges around the selection. You can choose how ragged the edge you want, add shadow and border. With little manipulation, you can have some highlighting effect like the following image.

https://lh4.googleusercontent.com/-rBN-utD4jfE/UP9-QLLIlGI/AAAAAAAAEVQ/Mq-4IPwVfDM/s640/gimp-tear-off-2.png

Example of Tear-off plugin

(screenshot edited from GIMP website)

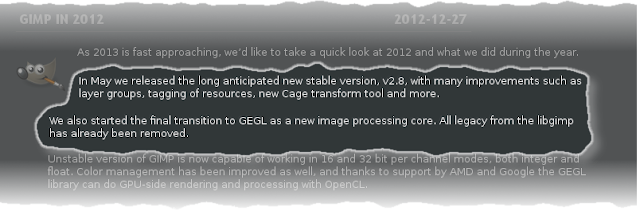
The selection doesnt have to be rectangle as you can see from the image above. I used Tear-off twice and with brightness and contrast adjust plus mask editing for the fade-out effect at top and bottom of image. That makes the important part very stand-out and also keeps some context around selection.

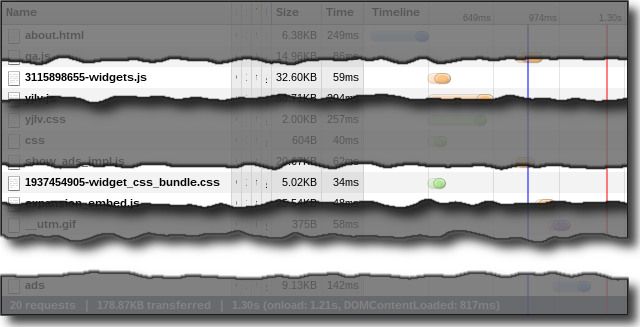
Ive used Tear-off for screenshots for my posts. Next example uses first tear-off to highlight two rows, then second one to cut off unwanted rows between wanted area and the bottom row. I wanted to preserve the information in bottom row but not to highlight it since its not the primary focus.

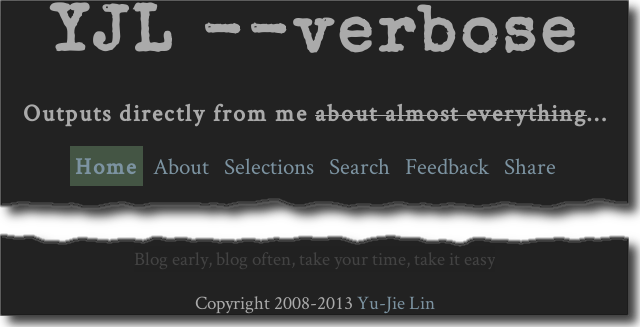
If you have a screenshot is very long and you only need top and bottom area, here is how you do it. Select unwanted area, then inverse selection, apply tear-off, lastly, the zealous crop to compress the image. You will get a compact image like the following one.

The version of Tear-off I use is 0.2, more than two years old, for GIMP 2.6. The latest GIMP version is 2.8, I dont know if this plugin works in GIMP 2.8. Its licensed under the GPLv3, anyone can fix or improve this plugin.

xcinfo is a utilization I use for bzen2, it was hosted on GitHub alongside my dotfiles. Because of this one-liner, I decided to move it to its own repository and expand it with a few examples.

That one-liner snaps a screenshot after detecting mouse movements. I like this idea, though it has no use for me. I think its more or less for security measure. The method it uses is to read the device file of X pointer, it has pros but also the cons. I decided to write an alternative using xcinfo, which becomes an example of xcinfo.

I am sure some of you who write shell scripts has hard time to get X cursor information, mainly the X and Y position. I was not aware of any handy program for getting those two numbers. Thats why I wrote that little C code in the first place last year.

The information which xcinfo provides should cover most of your usage, the cursor position and screen size. If you need more, open a feature request issue, I will see what I can do about. A pull request, that would be even better.

By the way, I have also worked on a fun example, you can also read the examples section on project website.

I was going to take a screenshot and crop out important part, and think I might upload to Picasa Web Albums. As I recall, it doesn't count the quota if the size is smaller than 800 pixels. (I know Flickr has bigger size for free uploads, but I always feel I shouldn't upload screenshots to Flickr.)

I wanted to make sure so I googled and I was amazed that free quota for images it's now up to 2048 by 2048 in size. Hooray!

But, wait! Read carefully! It's eligible only if you are a Google+ user, or it's still 800x800.

So, I just signed up and linked to my Picasa Web Albums account, whatever it asked. A couple of clicks, I saw the first page of Google+, then I closed it. That's all my experience about Google+.

When Google+ just got released, immediately people started to compare it with Facebook. Face, what? Never really understand Facebook and that makes me have same feeling for Google+.

Anyway, if you want free 2048x2048 uploads, go sign up for Google+. Now I am sure I will upload all my screenshots to Picasa Web Albums.   But normal photos will still go to my free Flickr account even they only are showed in up to 1024x1024.

I am sure more and more free Flickr account holders who upload screenshot will start to use Picasa Web Albums for their screenshots. Generally, good screenshots have to be pixel-by-pixel, not to be resized. 2048 pixels is more than enough for most of people.

In my Fluxbox keys, I have three keys to take different kind of screenshots using scrot, whole screen, window, and window with window manager decoration aka window border. If I only need a portion of screen, I would grab the whole screen, then use GIMP to crop it; or I will use GIMP to grab screenshot.

Recently, I started to looking for a note taking program and I chose KeepNote. It has a hotkey Ctrl+Insert to insert a screenshot from an external command, I think its very interesting and useful function to me. The default command is ImageMagicks import. For some unknown reason, it always gave me an all black screenshot if I select normal windows area, but Fluxboxs toolbar can be grabbed correctly and I could have correct screenshot if I run import from a shell.

Note

Im no longer using KeepNote since 2010-11-15, now Vim Notes, instead. (2015-08-19T22:48:20Z)

Of course, I could always make a screenshot, then import it into KeepNote, but that seems to take too much efforts.

So, I found a program called xsnap, I am using version 1.5.6. It supports window (mouse middle button click) and region grab (drag a region). It doesnt accept a filename by default, a simple shell script for KeepNote to do the job:

xsnap -png -file "$1"

Note

my use cases. (2015-08-19T22:42:24Z)

I also specify the format, though PNG is the default format.

I think its also the time to let scrot get retired in my Fluxbox keys:

None Print :Exec xsnap -file "$HOME/tmp/ss/$(date +'%Y-%m-%d--%H:%M:%S.png')"

Note

Ive switched to dwm since 2011-07-06. (2015-08-19T22:43:56Z)

The old ones using scrot:

None Print Print :Exec scrot '%Y-%m-%d--%H:%M:%S_$wx$h.png' -e 'mv $f ~/tmp/ss'
None Print S :Exec scrot -s -d 1 '%Y-%m-%d--%H:%M:%S_$wx$h.png' -e 'mv $f ~/tmp/ss'
None Print B :Exec scrot -s -b -d 1 '%Y-%m-%d--%H:%M:%S_$wx$h.png' -e 'mv $f ~/tmp/ss'